Saturday, October 22, 2011

Grandma's Quilt

I finished sewing Grandma's quilt up last weekend and sent it off to her on Monday.  She received it Friday and is so thrilled with it.  She says that it matches her decor perfectly.  I am so happy that she loves it, because by the time that I was finished with it, I wanted to keep it for myself.


I ended up inserting a little strip in it to make it longer. When I originally cut up the squares I had decided on a certain dimension, but when it came time to sew the squares together, I didn't remember what I'd decided.  So I just guessed, and it turned out wrong. I had wanted to do 9 squares by 12 squares, but I sewed them together in 10 by 11 (and I had to cut a few more).  Then the quilt was too short and I had no more scraps to add in.  I was thinking about just adding a top border, but when I mentioned my problem to Katja, she suggested adding in a strip instead.  So I did, and I really liked the way it turned out.


I ended up quilting it in a zigzag pattern in the squares, and did a little stipple in the floral strip section.  I bound it in a peach check that was perfect for the quilt.  After I washed it up, it was so crinkly and soft and even better than I imagined.  I know that it will keep Grandma company through many evenings of TV watching.

I better go get going on my next quilt!  I have a long list of quilts to make....

xo Nicole

Tuesday, October 18, 2011

I'm Teaching!


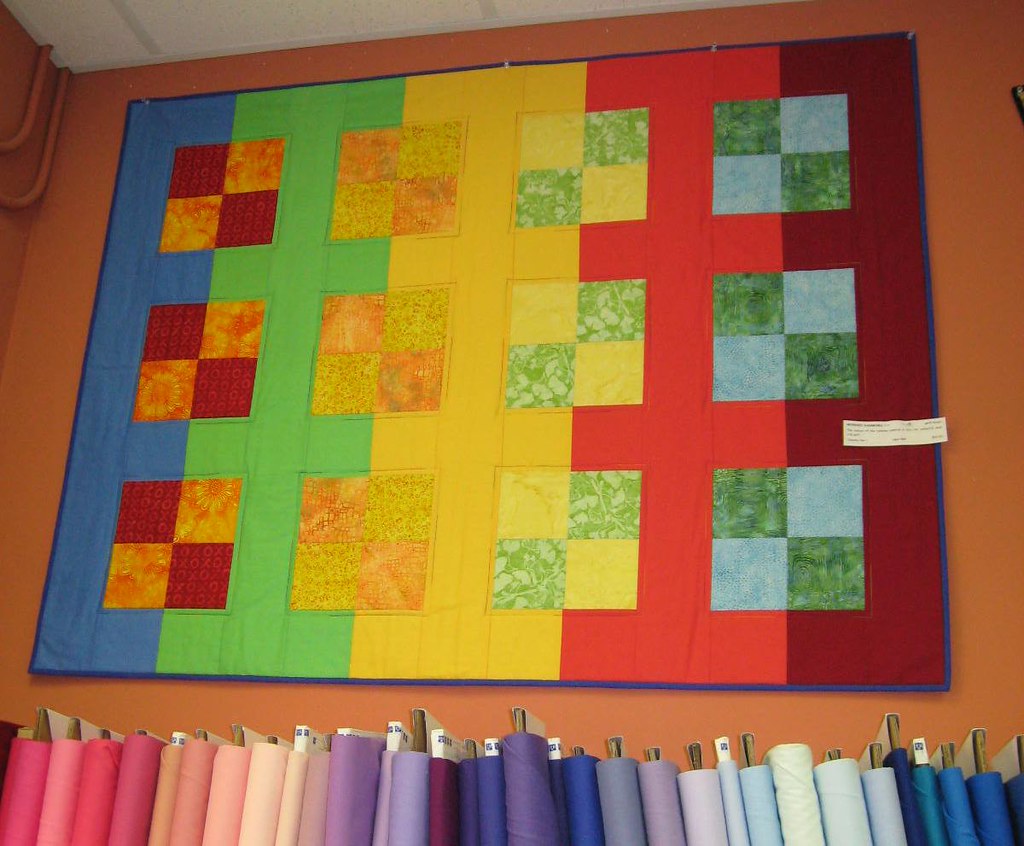
This quilt is called Reversed Rainbows and I will be teaching a class on November 1st.  If you want to make one of your own, please sign up this week at Katja's Quilt Shoppe in Kamloops.  Hope to see you there!

xo Nicole

Thursday, October 13, 2011

Placemats


 I made up a set of four placemats for my cousin for a wedding gift.  She just got married on the September long weekend.  I had some fun fruit fabric (alliteration anyone?) and combined it with some other fabrics in my stash.  I enjoyed putting in some colours that didn't match exactly, but I thought they spiced it up a bit.  When I tried adding colours that were a little closer match to the fruit fabrics, it looked really dull.


I added a fun striped fabric to the back so they can be reversible.   I quilted straight lines about 3/8" apart and a solid green binding was machine stitched on.  Once washed up they still look great.  The only thing that I am not so happy about is the way that the fabric looks like it has chevrons from the quilting.  Oh well, next time will be better.

xo Nicole

Friday, October 7, 2011

Doll Quilt Swap 11 Received!


I actually received it about a month ago, but forgot to blog about it!  I don't know why because I really love it.  It was made for me by a lovely woman, Wendy.  On Flickr, she is known as On a Whim / Little Whimsies.


She posted some sneak peeks during the construction phase, and I had commented that I really loved it and the colours were awesome.  I never dreamed that I would be receiving it!


She also included a couple extra goodies - magnets covered in coordinating fabrics, some fun pins and a little sticky note pad.  I love these too!


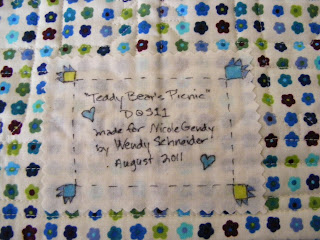
She called the quilt "Teddy Bear's Picnic" possibly because in one of my comments I mentioned that the tiny bear paws could be teddy bear's paws.  Whatever the case, I sincerely love it and it's hanging up behind my sewing machine now.  It inspires me everyday with it's tiny loveliness.

Have you ever made a mini quilt or a doll quilt?  You should - it's fun and fast!

xo Nicole

Tuesday, September 20, 2011

My Beet Soup


I can't say that I know how to make Beet Borscht or anything. This is just my made up recipe and I think it tastes good! This is a great time of year to make things with beets.

1 onion
2 stalks celery
2 cloves garlic
5 or 6 beets
2 carrots
1/2 head of cabbage
1 large can diced tomatoes
farmer's sausage
bullion cube
s & p
dill

I start with onions, celery, and garlic. Chop 'em up and throw 'em in a pot with some olive oil and cook them while you are preparing the next stuff. I chop up the beets into small cubes and add them into the pot. Same thing with the carrots and cabbage. Then I throw in the canned tomatoes and some water and a bullion cube. I turn up the heat to make them boil, then turn it down to simmer. I also cut up some farmer's sausage and add it. Totally optional, but it tastes really good. Then I just cook it up until it's done, maybe one and a half hours. Before serving, I throw in the dill and when it's in the bowl I blob in some sour cream or plain yogurt. You can even sprinkle in some more dill if you like. Eat it up with some fresh bread. Yum!

Pretty simple and very tasty. Let me know if you try making it sometime or if you have any questions.

xo Nicole

Saturday, September 17, 2011

One of my Works in Progress

This weekend I started with a pile of fabrics that are leftovers from a quilt I made for my mom and added in some solid peach fabrics. I'm making a quilt for my Grandma V.

I recently visited her and she was showing us her new digital cable box and trying to figure out how it worked. I thought that she would enjoy having a quilt to keep her warm while watching her favourite shows this winter.

Her favourite colour is peach and I thought that it would go well with these florals. I think that it makes a lovely simple patchwork. My stack quickly was cut and began to be pieced in a few evenings.

I currently have all the rows sewn together and will hopefully finish the top tomorrow. The squares are cut 5" and the quilt will measure about 45"x 50", big enough for a lap quilt on her recliner. The colours are better in real life, but that's what happens when you sew at night and have a crappy camera.

I'm generally not a huge floral fan, but there are some prints in this quilt that I really love. I hope that my Grandma will love them too.

xo Nicole

Wednesday, August 31, 2011

Beach Huts

I recently participated in a Doll Quilt Swap on Flickr. This is the first time that I have participated in this swap. Basically I get a secret partner and make her a mini quilt and in return, someone else makes me a mini quilt in secret. It is fun to find out information about what your partner likes and would want, and then make the perfect quilt for her.

The rules are fairly simple. It had to be between 9"x9" and 18"x18". It needed to have a least six pieced blocks and be a miniature version of a bed quilt, ie. no art quilts. And you have to send it on time, or you are not allowed to participate in future rounds.

I started out making something with a colour palette that I hadn't used before, but it just didn't seem to be calling out to be sent to my partner. So I tried again. I came up with this idea of using lots of fun, bright scraps and making beach huts. My partner lives in Florida, so I thought this would be perfect. I added a fun rainbow scrappy border and hand-quilted it with a variegated thread. I haven't really hand-quilted before, so it's a little puffy. I think that next time I would use a hoop to keep things a little more flat. It's not perfect, but I really like it and my partner loved it too! I sent her some scraps and a little notebook for extras. She received it last week. (I am still waiting for my little package to arrive!)

xo Nicole


Wednesday, August 24, 2011

Sixteen Again

I mentioned in a post recently that I will be teaching a couple of quilting classes in the fall. This is one of the quilts that I made for a sample. I wanted to do something fun and easy with solids that looks very striking.

I won't go into a lot of detail about how I made it, but it turns out to be a very nice lap size quilt, perfect for snuggling up with on the couch. I always like a nice big quilt to keep me warm in the winter.

I decided to quilt diagonal lines on it and used 5 different thread colours since I just couldn't decide on one. I actually really like how it looks! The binding is my extra bits of fabrics and I think it looks pretty cool. Hopefully some people will sign up for my class!

xo Nicole

Wednesday, August 17, 2011

Preoccupied With Pigeons and Kitchens

Early this summer I noticed a pigeon start building a nest up near our roof line. Unfortunately, there was nothing I could do to make her move somewhere else. She ended up laying eggs and then I couldn't bear to get rid of her. So I named her Pidgey-Lou. And her partner is Mr. Boo. He only came around from time to time, but the nest was really too small for both of them to be there together.

Pidgey-Lou had two babies and I watched her feed them from my sewing room window. They always got very excited when she came with food. One day I noticed that peeping was coming from below. I went downstairs and found that one of the babies was on our balcony. I guess he fell out of the nest. He had a broken leg, but managed somehow to get to his mama when she came with food. The next day, the other baby was on the balcony too.

They have pooped everywhere, but I love watching them, especially when Pidgey-Lou comes to feed them. They get all excited and flap their wings and peck her and are generally noisy. They fight each other too, to get at mama. (I named them Tweedle-dee and Tweedle-dum. Tweedle-dum was the one who fell out of the nest. He seems to be doing fine now, but has a limp). They enjoyed having our old kitchen cabinets on the balcony. I think it was like a playground to them. Sorry, we had to haul those things to the dump!

We began renovating our kitchen on August 7th. We are undertaking everything by ourselves and it is a little scary considering we haven't renovated anything before. Luckily things are going pretty smoothly so far. We ripped out all the old cabinetry and the super ugly backsplash.

We are keeping the tile floor but have to fill in the gaps where the old cupboards were so that the new cabinets have a nice level ground. It was pretty nasty on the wall behind the sink. I guess a lot of water leaked in over the 30-odd years the kitchen was in here.

We had to do a bit of wall repair where the old backsplash was ripped off, but we aren't professionals. It looks ok, but most of it will be covered with our new tile backsplash. It sure makes a lot of dust though!

We then primed over most of the wall to seal it. I bought a small can, but we used the whole thing. I'm sure that I could have bought a bigger can and done two coats, but I think it was good enough. At least I know how to paint! I tried to teach Nader how to do it, but he wasn't very confident in his abilities. I think it was fine.

I ended up doing the second coat of paint by myself while he was at work since I had time. We also left a message for anyone who will renovate the kitchen in another 30 years! It will be behind the new base cabinets. Now we are going to pick up the first load of cabinets and the test will be the installation. We need our plumber friend to come and help us deal with a couple of things before we can install the cabinet where the sink will go. I hope it all works out!

I haven't been sewing much in the last few days, but I do have a little project to show you soon.

xo Nicole


Monday, August 8, 2011

Something Exciting

Last month I received a phone call. It was from Katja, the owner of Katja's Quilt Shoppe, and she wanted to know if I was interested in teaching some quilting classes and working in her shop! Of course I said, "YES!"

I have been dreaming for the last year or two of teaching some quilting classes and wondering if that was something that was destined to only be a dream or if it was something that would come true one day. I didn't apply or ask if she was looking for anyone. She just called out of the blue. I was very flattered and humbled that she liked my work enough to ask me. What an honor. Thanks Katja!

I started working in the shoppe last week and will teach two classes in the fall. The picture above shows one of my quilts with the fabrics. I am nearly done my sample and then I will show you some pictures of it and tell of the angst involved...

xo Nicole

Saturday, August 6, 2011

Bee Quilt


I finished up this quilt at the beginning of July and gifted it almost immediately. It went to some friends who were in need of some encouragement during a difficult period in their lives.


I made the quilt with some blocks from my two online quilting bees (Circuit Block Party and The Maple Leaf Bee) from 2010. My original vision of the quilt did not come to fruition due to blocks being a variety of sizes instead of 12.5". (One of my own star blocks was not included because it turned out to be 12".) So, I had to put on my creative thinking cap to come up with a solution to this problem. I had 5 star blocks and 10 improv blocks and my desire to have a quilt that was a decent lap size. I wanted it to be 5 by 5 blocks. The photo above shows what I was thinking at the beginning of this process.


I went to work making blocks. I made 4 improv blocks with lots of small pieces of leftover fabrics. (Those blocks are in the outside centers of the quilt in the photo above.) Then I wanted to make 4 more blocks that were keeping with the scrappiness of the quilt, but had some structure to them. I came across a photo on Flickr that had a block I loved, so I decided to make my 4 blocks with it.


In the end, this is the layout that I went with. I put the star blocks in center of the quilt and put my mosaic blocks in the corners with the improv blocks spaced in between everything. I wasn't really loving the results, but I had a quilt top anyway. I decided to make it a bit longer, but instead of doing more blocks, I added a top and bottom double border. I think that it really helped to tie everything together. (See first photo.)


I decided to just piece the back together out of leftover chunks of fabric. I think it turned out pretty good. The grey solid actually isn't the same as on the front, but I figured nobody would notice that.


We had a lovely day to take photos of the quilt and Nader's shirt even matched the quilt. He begged me to take the label off and give it to him instead. I guess I got him hooked on my quilts!


For the double borders I decided to try a new free motion quilting design. It shows up best in this photo of the back. The bigger circles were in the solid yellow border and the flowery design was in the larger print strip. They aren't perfect by any stretch of the imagination, but it was fun to try out a new design. I'll definitely do them again.


I decided to bind the quilt in the charcoal solid fabric and I love the way that it frames the quilt. To save time I machine sewed it and it looks really good! In the end, I am pleased with the quilt and I know that our friends love it so much. I hope they get lots of use out of it (now that it is in Australia!).

I have some other exciting news, but I will save it for a future post. I am running out of steam tonight!

xo Nicole

Wednesday, July 20, 2011

Mexico Quilt(s)

I may have mentioned before that I was starting a project at church to send quilts to Mexico. It's called Project Cobija (quilt in spanish). Each summer our church sends down a team to build 8 or so houses in Tijuana. Last year when I went, I thought that it would be fabulous if each family was also given a quilt with their new house. With the help of some wonderful women at church, we sent down 10 quilts last week. Above are some of the quilts that were given away.

The quilt that I made was mostly from my scraps! (I think I need to make another one to thin them out some more). I followed a tutorial from Amanda-Jean at Crazy Mom Quilts. She called it Easy as Pie. It definitely was easy!

I cut out the pieces in one evening and sewed them together in three more. I basted it and then quilted it in a couple more. I quilted it with a free motion loopy stipple so that it would be nice and sturdy.

I decided to machine sew the binding for durability and speed. It was my first second time attempting machine sewing binding (I don't want to talk about the first time...). I'm very pleased with how it turned out! I know it looks kind of white in the pictures, but it's a light greeny batik. I even finished my quilt before my deadline! That pretty much never happens.

I'm very pleased with the end result! Maybe I will have a picture to show later with its new family.

xo Nicole

Friday, June 24, 2011

Carmen's Practical Bag

Last week I made a bag for my friend Carmen. She was looking for a cloth bag that was big enough to fit in some specific items.

She looked at several stores without luck, so I offered to make one for her. She came over and picked out some fabric at my "store." (You know you have too much fabric when you refer to your stash as a store).

I used the Practical Bag pattern by Grand Revival Designs. I made one of these bags for myself in the fall and I really enjoyed the pattern. It was easy to follow and well laid out. I think the design is really clever too.

I made the lining out of two different fabrics for fun and added in a couple pockets made from scraps. I didn't add interfacing to the lining but I think that next time I will. It would make the bag just that much sturdier.

I top-stitched in a turquoise thread for some contrast and I am very pleased with the outcome. The most difficult part of making the bag was getting the 'v' to lay flat. Hopefully next time they will look a little better.

I also bought a purse pattern (called Flea Market Bag) by Grand Revival and have yet to try it out. I hope it will be as simple and clever as this bag. Have you made either of these bags?

xo Nicole

Monday, June 20, 2011

some quilts to share

This first quilt is one that I made for my nephew Paul. He's so adorable and I really love him. I wish I lived closer by. I started making this quilt before he was born, before any of us knew if my sister was having a boy or a girl. I wanted to make something gender neutral. I found the pattern in a book called Great Little Quilts that my great-aunt gave to me. The pattern is called Single Wedding Ring, but it's also known as Crown of Thorns.

The book didn't really give very specific instructions, so I just made up my own size block. Unfortunately, I forgot to add in seam allowances. I cut all the fabric before I discovered this. Luckily, it still sewed together nicely, just a little smaller than I anticipated. Which also meant that it took longer. I think I also underestimated the complexity of each block. The quilt has 12 blocks, each made up of 25 squares and 16 of the squares are HST (half-square triangles). Each square ended up 1.5" finished.

I eventually finished it up and added a couple borders to make it a little bigger. I was only going to make one border originally. I took some time to think about how to quilt it. I didn't want to take away from the beautiful blocks or to be too densely quilted. I ended up doing straight diagonal lines that brought out some of the secondary patterns of the blocks. I also chose to do a fun binding on an otherwise traditional quilt. Don't you love the backing fabric?

This is a quilt that I made for my sister Frances (Paul's mama) on her birthday last year. I forgot to take any pictures of it before giving it away, so it has been unblogged until now. I think that I bought it as a quilt kit, but can't remember where. It's made of fabulous, bright batiks and a white on white fabric. The design is from Atkinson Designs called Lucky Stars.

It came together quite quickly because the blocks are 15". The quilt ended up being 45"x60" - a nice size to snuggle on the couch with. I quilted it with a loopy meander - my go-to free motion quilting.

The back is just a solid green with a few scraps thrown in. I like the simplicity of the design.

The last quilt to be featured today is one that I made with Cherry House Quilt Along. She called it the Socken quilt. It was quite simple to put together. The little squares finish at 1". I was inspired by the quilting on another of her quilts, and attempted to do something similar. I really like how it turned out. I gave it to a special baby in our church a few weeks ago. I hope that he loves it and gets lot of use out of it.

Thanks for stopping by!
xo Nicole